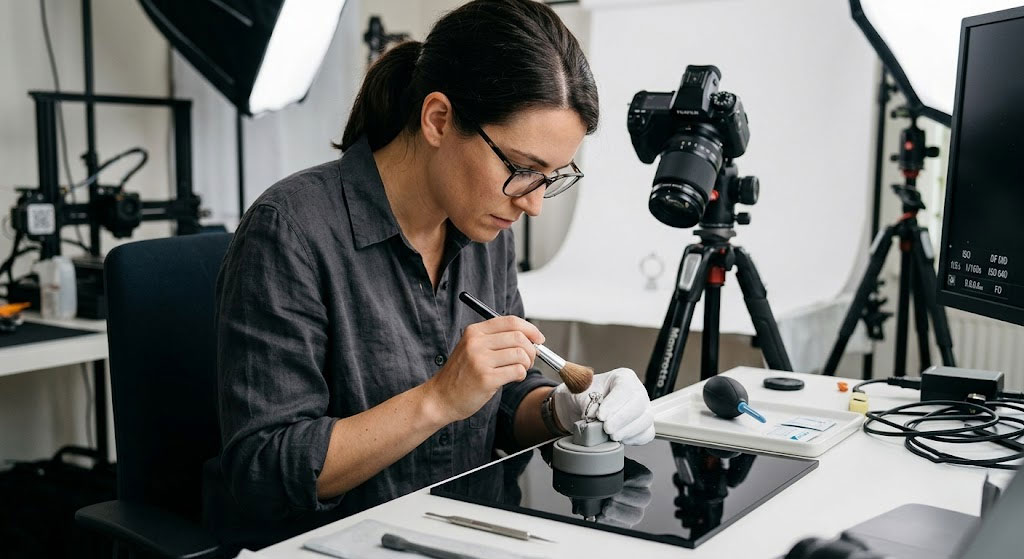
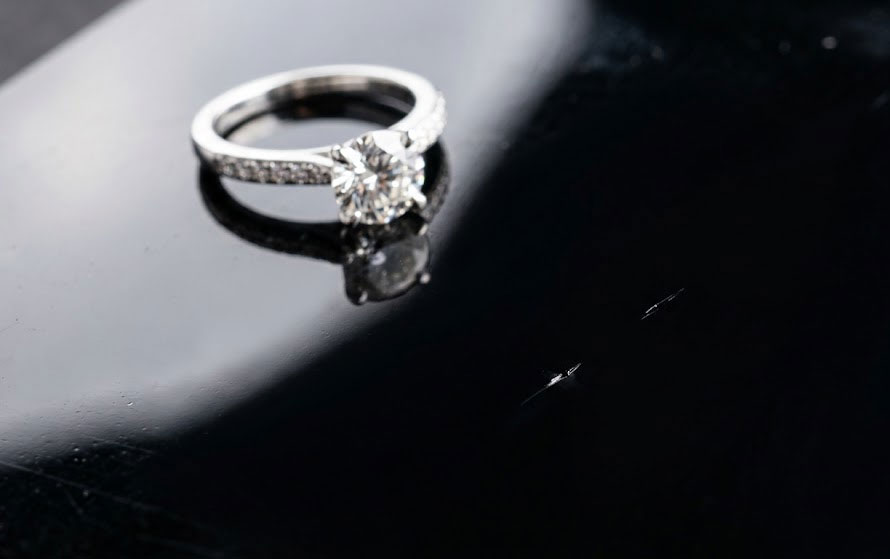
Jewelry is small, shiny, and it really shows dust in photos. It is macro phottogprahy so also the dust is magnified and shot really close. Same goes for scratches on jewerly. A micro scratch on shank can be visible under macro photography immediately. It can be thinner then a hair and it will show up. Same goes for small hairs, tht happen to end up on the surface of the jewelry shank for some reason. This is normal when you shoot reflective metals and using macro lense.
The hard part is not removing the dust. That is easy. The hard part is removing it professionally, so you do not leave any mark while using Photoshop of course. Many cheap retouchers leave the mark always. You can clearly see the shank has been altered somehow. There could be a color mismatch, smudged surface, they smooth it too much and you can see that the texture of the metal is gone. We can go on and on what can potentially happen.
It looks simple to just use clone, or smart clone in Photoshop. But it is not. There is usually not a lot of surface to clone from and many times cheap retouchers instead of removing imperfection just use shanks from other pictures and they just copy paste them on your jewelry. This is really popular still.
There should not be any gap between real image that is clean or retouched image where we clean the imperfections.
Why jewelry picks up so much visible dust in the first place
Most jewelry photography happens on a light table, often jewelry being placed on glass or acrylic, lit from multiple directions to bring out sparkle and shine. That combination of the glass, lights and reflective product brings out all the imperfections.
It could be dust, fingerprint, scratch on teh jewelry or better yet surface that will be used as a background in the image. When a photographer takes hundreds of images per day, these details are not very well looked upon.
None of it is really avoidable during a shoot, no matter how careful the photographer is. Jewelry retouching exists partly because of this. It’s not really optional if you want pictures of jewelry that look professional.
The mistakes that make dust removal look worse than the dust
Before getting into what actually works, it’s worth being honest about what doesn’t. A lot of low-effort retouching handles dust with one of two shortcuts, and both leave a mark. Noise filters are one of them. Using a photoshop dust-and-scratch reduction filter across the whole image is fast, but it doesn’t know the difference between a dust and lets say texture of hte jewelry. The result is that is smoothese the whole piece which is not necessary. There are brush marks on matte gold and the natural grain of the surface, gets softened right along with the dust. The photo ends up looking blurry nd fake rather than clean.
Bad cloning is the other. Grabbing the clone stamp and pasting a nearby patch of metal over a piece of dust is a well used technique, but only when it’s done carefully, sampled from the right angle and light direction. Rushed cloning creates a patch that doesn’t follow the curve of the piece, and under close inspection (which is exactly what a customer does when they zoom in on a ring they’re about to spend real money on) it reads as an obvious repair rather than a clean surface.
Both of these are the same mistake we’ve talked about with over-retouching in general. The goal isn’t to make the flaw technically disappear. It’s to make the photo look like the flaw was never there, which is a higher bar.
Getting a good photographer is a must
The best dust removal is the dust that never needed removing in the first place. A good photographer prepares every piece of jewelry and surface before it goes in front of the camera, wiping it down with a non-static cloth to lift off most of the dust and dust before the camera shutter captures the image. Good lighting helps too. A well-diffused light source shows far fewer floating specks than a small, harsh point light does, simply because there’s less contrast for a tiny particle to stand out against.
None of this is a reason to cheap out on the shoot itself. A clean piece, decent lighting, and a camera that can actually resolve fine detail will save far more retouching time than any amount of clever editing afterward can make up for. The less a retoucher has to fix, the less risk there is of a fix looking like a fix.
What actually works: our process
We start with selection, not filters. Before touching any pixels, we isolate exactly the area that needs work using precise selection tools, usually the pen tool for anything following a curved edge like a shank or bezel, and the lasso for smaller, irregular dust spots. This matters because it means every correction is contained. Nothing spills over into surrounding detail that didn’t need to be touched.
We use the spot healing tool in most cases, sometimes content-aware fill for genuinely small imperfections. For a speck of dust sitting on an otherwise clean, flat area of metal, these tools do a good job pulling in nearby texture automatically. The key is using them at a small brush size, one dust spot at a time, rather than dragging broadly across a whole section and hoping the algorithm figures it out.
We clone by hand for anything near an edge, a facet, or a reflection line. Automated tools tend to struggle right where metal meets a stone, or where a highlight crosses a curved surface, because the algorithm doesn’t understand the geometry of what it’s looking at. In those spots we sample manually from a matching area of the same piece, ideally from the same lighting angle, and blend it in with a soft-edged brush at reduced opacity so the transition is gradual rather than a hard patch.
We check color before we consider anything finished. Even a perfectly shaped clone can look wrong if the tone is slightly off. We use the eyedropper to sample the exact surrounding color before painting or correcting anything, and we double check under zoom, because a color mismatch that’s invisible at thumbnail size becomes obvious the moment a customer clicks to view the full image.
We blend with the smudge and dodge and burn tools, but only as the final smoothing step, never as the main fix. After the actual repair is done, a light pass with the smudge tool can fix any remaining hard edge into its surroundings, and dodge or burn adjustments can match the local exposure so the repaired area doesn’t sit slightly lighter or darker than the metal around it. This is the real professional work, not the fix itself. Relying on smudging to disguise a bad clone just spreads the problem out instead of solving it. Smudge also makes the jewelry look really fake, if you use big brush instead of small brush size.
We zoom to 100% before calling anything done. Dust removal that looks fine at preview size can still show visible patch edges or texture mismatches at full resolution, and full resolution is exactly what a customer sees the moment they zoom in on a listing. Every image gets checked before it ges delivered, not just glanced over as thumbnail size.
Scratches on the jewelry itself versus scratches on the set
It’s worth separating two different problems that get lumped together. Dust and scratches on the display stand, the acrylic riser, or the background are pure production debris and should always come out completely. There’s no argument for leaving them.
Scratches, marks, or wear on the jewelry piece itself are a different conversation. If a customer is buying a brand-new piece, fine surface marks from handling during the shoot should be cleaned up so the photo represents the item as it actually ships, new and unworn. But if the piece is genuinely vintage, antique, or being sold specifically with its wear as part of the story, removing every mark can cross into misrepresenting the product. In that case it is better to leave some imperfection that show that the piece is vintage and was being used for years.
Why this level of care actually matters
A single missed dust spot on one photo probably won’t cost a sale. But dust and scratch removal is one of those tasks that happens on every image, all day, across an entire catalog, which means small shortcuts compound fast. A studio that rushes this step ends up with a catalog full of tiny, barely-conscious red flags: a faint smudge here, a slightly soft patch there, nothing anyone can quite name, but enough to make the whole store feel less trustworthy than it should. Getting this basic step right, quietly and consistently, is part of what makes a catalog feel professional rather than just adequate. And customers want perfection when they look at your jewelry images online. If they see imperfections, they will bail out. Do you see Tiffany pieces with dust and fingerprints on their website? Probably not.